Flutter MFA with Firebase and Azure Entra ID

Firebase platform provides a quick and easy way to create high-fidelity Flutter applications in record low amounts of time. A massive free tier allows individuals and small companies to build and run event-driven apps for free for a small number of users, while taking advantage of cutting-edge security, load balancing, and autoscaling.
This article discusses how to set up Firebase and Azure Entra ID to enable 2FA/MFA in your Flutter application.
If you don’t want to use Firebase, see this article instead.
1. Setup Entra ID App Registration
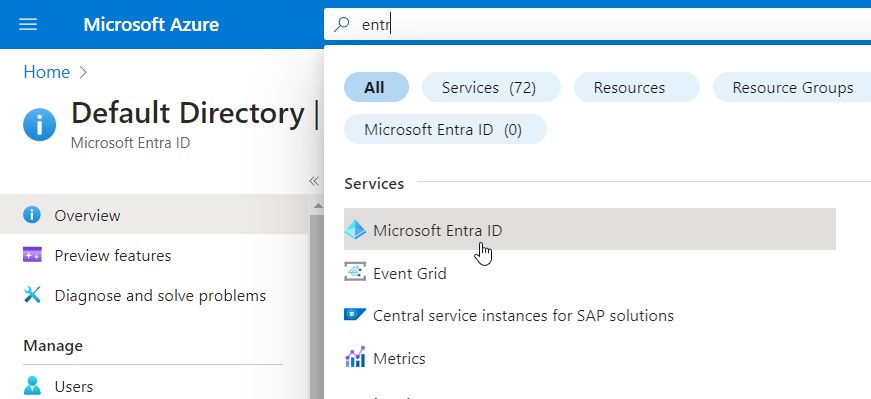
1.1 Navigate to portal.azure.com and search “Microsoft Entra ID”
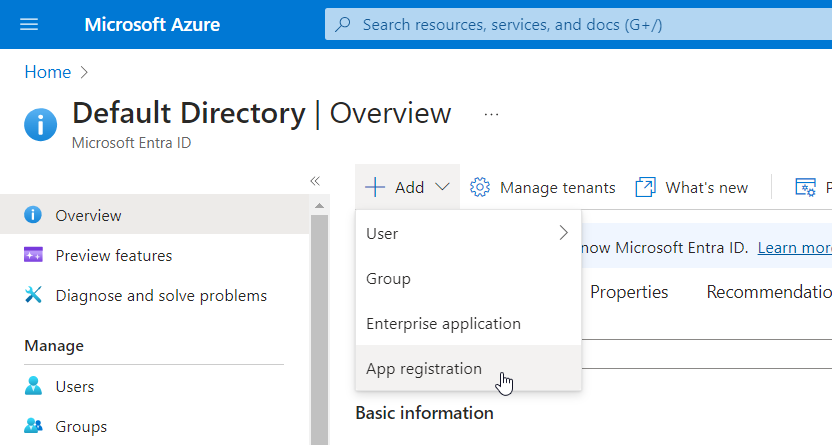
1.2 Click “+ Add” >> “App Registration”
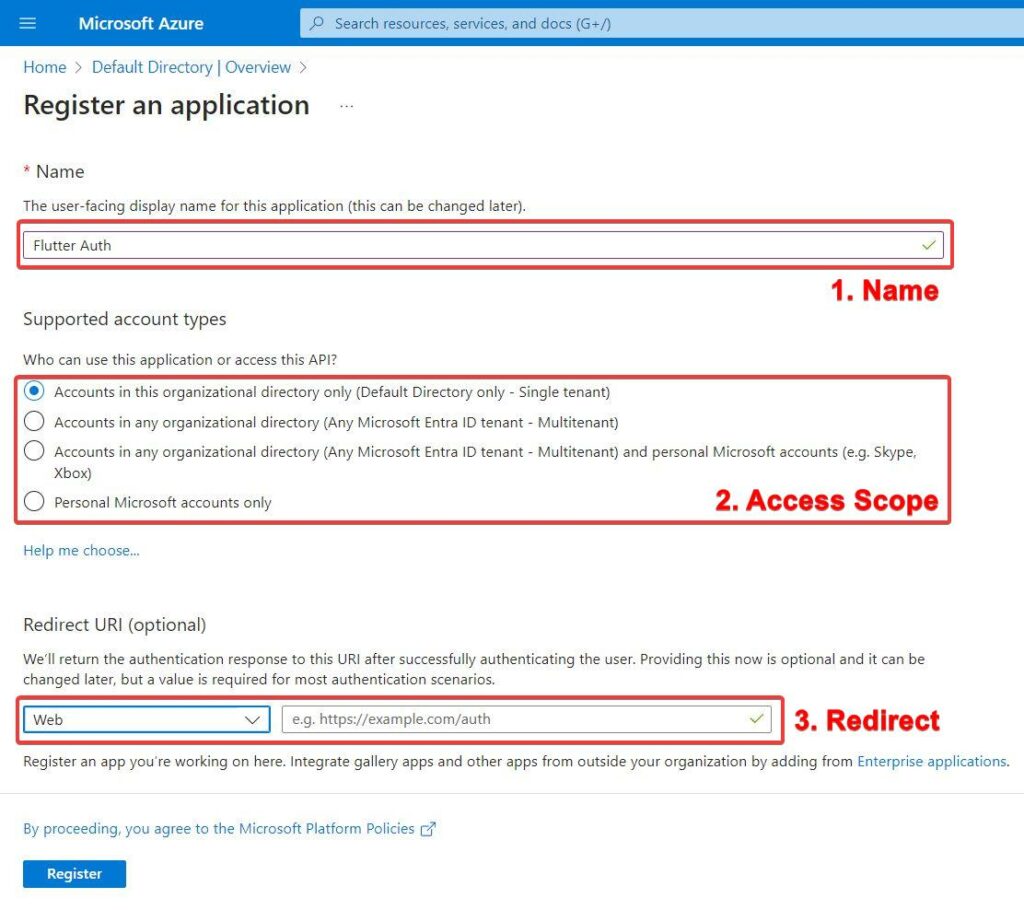
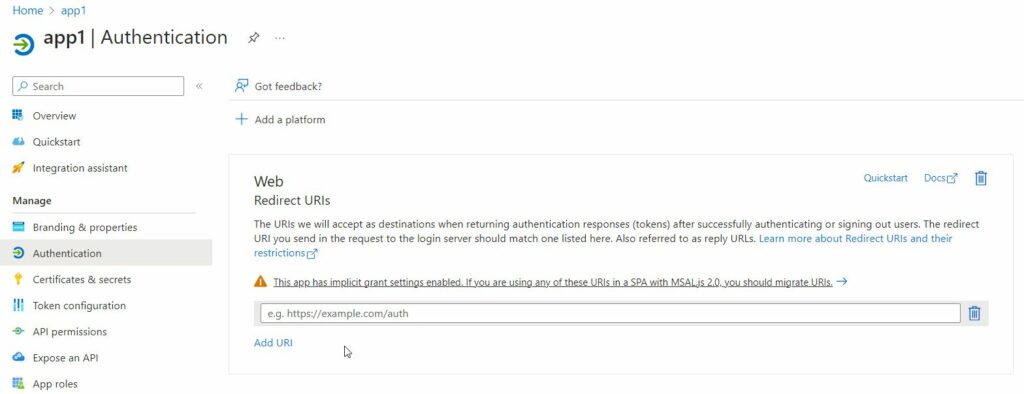
1.3 In the dialog below, enter your App name and set access scope. For Redirect URI, set Web, even if you are deploying for iOS or Android. The redirect URI will be copied from the Firebase config, and we will paste it here later.
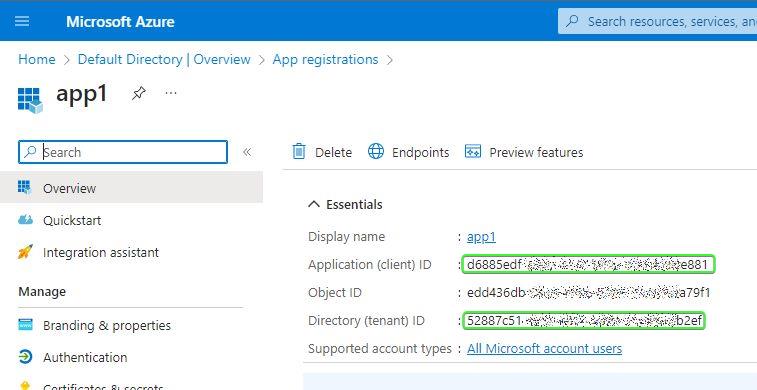
Click “register”. After that go to your newly created app. We will need to copy two things from here:
- Application (Client) ID
- Directory(Tenant) ID
1.4 Click on “Create a certificate or a secret”

1.5 Click “+ New client secret”, add the secret name and expiration, then “Add”, then copy the secret value.

At this stage, you have three values on your hand:
- Application (Client) ID
- Directory(Tenant) ID
- Client secret
1.6 Now go back to “App“ >> “Authentication” and prepare to enter the redirect URI we will copy from the Firebase.
2. Configure Firebase Project
Under your Firebase project, go to “Authentication” >> “Sign-in method” and add “Microsoft”
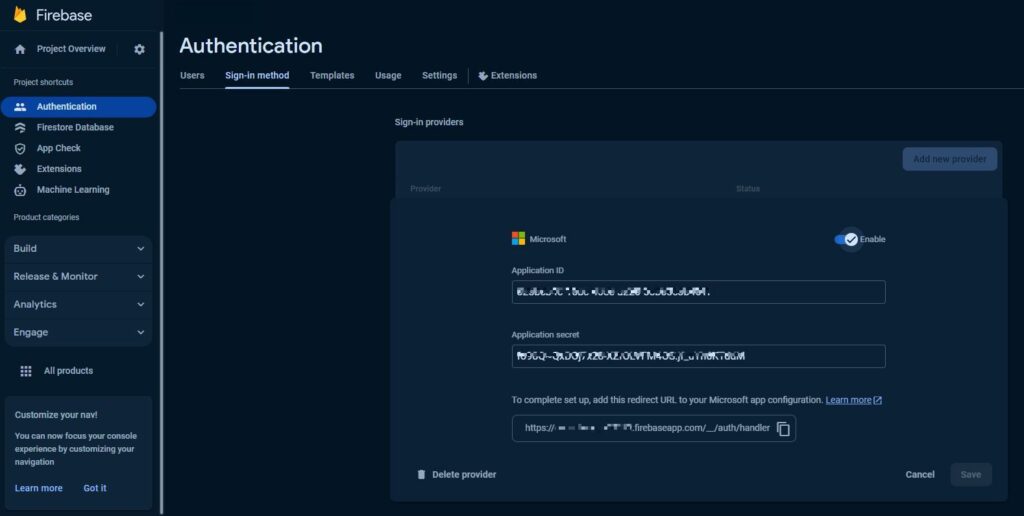
Paste here your Application ID and Application secret from step 1. You will never need those two values again, you can forget them.
Copy the redirect URI from here and go back to step 1.6. Paste that redirect URI into Azure and save. Azure Entra ID setup at this point is done.
Go back to Firebase, toggle the enable switch ON, and hit save.
This concludes our project setup in Firebase Console as well, we are left with only one “Tenant ID” value and are ready to commence writing some code.
3. Add Firebase to your Flutter App
Go to your Flutter project, and run the following in the console:
firebase login
dart pub global activate flutterfire_cli
flutterfire configure
This step is the same if you are building for iOS, Android and Web, and this will create a configuration file in your project that will allow you to connect to Firebase. More about it here.
Now add the required Firebase packages to your project:
flutter pub add firebase_core
flutter pub add firebase_auth
This concludes the Flutter project setup.
4. Add Authentication Code
Go to main.dart, initialize Firebase, and add authentication listener after your runApp call. That listener will react to authentication state changes and redirect user between login and home pages.
void main() async {
  WidgetsFlutterBinding.ensureInitialized();
  usePathUrlStrategy();
  GlobalKey<NavigatorState> navigatorKey = GlobalKey<NavigatorState>();
 // ...

  await Firebase.initializeApp(
    options: DefaultFirebaseOptions.currentPlatform,
  );

  runApp(MyApp(
      settingsController: settingsController, navigatorKey: navigatorKey));

  FirebaseAuth.instance.authStateChanges().listen((User? user) {
    if (user == null) {
      log('User is currently signed out!');
      if (navigatorKey.currentState != null) {
        Navigator.of(navigatorKey.currentState!.context)
            .pushNamedAndRemoveUntil(LoginPage.routeName, (route) => false);
      }
    } else {
      log('User is signed in!');

      // do something if you need to

      if (navigatorKey.currentState != null) {
        Navigator.of(navigatorKey.currentState!.context)
            .pushReplacementNamed(HomePage.routeName);
      }
    }
  });
}
In the example above, we assume that you already have a login page and a home page created.
Now, remember that one “Tenant ID” value we saved in step 1? Now is the time to use it. That value is considered a secret, but for simplicity, we will hardcode it right in the function body (and you can leave it there because that secret isn’t worth much without all the other data we’ve stored securely in Firebase). Let’s create two methods that will allow us to sign in and sign out of the app:
  ///
  Future<UserCredential?> signIn() async {
    final microsoftProvider = OAuthProvider("microsoft.com");
    microsoftProvider.setCustomParameters({
      "tenant": "52778c51-1a3f-4565-adb8-13a89abcd1ef", // Your Tenant ID
    })
      ..addScope("openid")
      ..addScope("profile")
      ..addScope("email");
    UserCredential? cred;
    if (kIsWeb) {
      cred = await FirebaseAuth.instance.signInWithPopup(microsoftProvider);
    } else {
      cred = await FirebaseAuth.instance.signInWithProvider(microsoftProvider);
    }
    String? t = await FirebaseAuth.instance.currentUser?.getIdToken();

    if (t != null) {

      //you can decode the token and get user data
      var decodedToken = Jwt.parseJwt(cred.credential!.accessToken!); // Get JWT parser
      log(decodedToken['email']);
      // update firestore user data in users collection
      User user = FirebaseAuth.instance.currentUser!;
      // do something with the user here if you like, i.e. create/update their account
      // or, notifyListeners();
    }

    return cred;
  }

  Future<void> signOut() async {
    await FirebaseAuth.instance.signOut();

    // notifyListeners(); if you are using change notifier
  }
Now you can wire those two methods into your UI or backend and enjoy the double-layer security of Firebase and Azure Entra ID!